
OpenCms Cluster Docker Image Is On Docker Hub Registry
- 8/25/14 7:56 AM
- Arash Kaffamanesh
OpenCms Cluster Docker Image

In my first blog posts (Part 1 - Part V) and on this google drive page "OpenCms Docker Cloud" I was explaining about Docker, OpenCms and how to build an OpenCms All-In-One stack to easily install and run the latest OpenCms 9.0.1 version in a docker container and extend the installation to build a loadbalanced OpenCms environment.
In this blog post I'm going to show you how you can run our OpenCms Cluster Docker Image to build an (auto-) scalable OpenCms Cluster with Multi-Workplace and auto-scalability support everywhere, where docker rocks, on your laptop, on bare metal, in your private or your favorite public cloud.
The latest production ready version is based on OpenCms Cloud eXtensions (OCCX) implemented by my colleauge, business partner and mentor Stephan Hartmann (CEO at Metamesh) and consists of 2 docker images, the opencms-stack-mysql image and the opencms-stack-cluster image, which can be pulled from the Docker Hub Registry.
For more information about OpenCms Cloud eXtensions please see our OpenCms Elastic Cloud Cluster presentation from OpenCms Days 2013, where we are showing the basics and how to scale the whole thing on hybrid clouds (on Eucalyptus and Amazon Web Services) to build high trafic web sites at hyperscale with multi-workplace and multi-region support.
I assume you're familiar with Docker and you're already running the docker engine on your host, or in your Vagrant, VirtualBox, CoreOS, CentOS, Ubuntu or on your Atomic VM or host.
As mentioned above, first we need to pull our opencms-stack-cluster and opencms-stack-mysql images from docker hub registry on our host or VM with:
$ docker pull cloudssky/opencms-stack-mysql
$ docker pull cloudssky/opencms-stack-cluster
The download will take almost 15 - 30 minutes for both images to finish.
First we start our opencms docker mysql container with the docker run command:
-bash-4.2# docker run -td -P -p 3306:3306 cloudssky/opencms-stack-mysql
-bash-4.2# docker run -it -d -P -p 80:8080 cloudssky/opencms-stack-cluster
b9259e5ecd64553e356c6c2180637fdfd287938a0ca498ad8409a9083d36bac7
The above command will drop you into the opencms cluster container and you shall run the following sed command to change the hardcoded IP address of your VM or host where your MySQL container is running, in our case we are running both conatiners on the same host, but you can also run your MySQL container on any other host.
Use "ifconfig" to find the IP address of your host and run the following command to replace the hardcoded 10.0.0.16 MySQL IP address in opencms.properties file (replace <Your-DB-IP> with the IP of your docker VM / host):
[ root@da501f5b8f83:~ ]$ cd /var/lib/tomcat6/webapps/opencms/WEB-INF/config/ && sed -i 's/10.0.0.16/<Your-DB-IP>/g' opencms.properties
and restart tomcat6 to connect to the right database:
[ root@da501f5b8f83:~ ]$ service tomcat6 restart
* Stopping Tomcat servlet engine tomcat6 [ OK ]
* Starting Tomcat servlet engine tomcat6
To verify if the first node of your OpenCms Cluster is running, do a tail on opencms.log file:
[ root@da501f5b8f83:~ ]$ tail -f /var/lib/tomcat6/webapps/opencms/WEB-INF/logs/opencms.log
25 Aug 2014 10:24:39,763 INFO [ org.opencms.main.OpenCmsCore:1540] . OpenCms is running! : Total startup time was 00:00:10
25 Aug 2014 10:24:39,763 INFO [ org.opencms.main.OpenCmsCore:1543] . ...............................................................
OpenCms is up and running in 10 seconds :-)
Now that our first container is running, you shall commit this conatiner with the right IP address of your MySQL DB over your opencms-stack-cluster, to do that, open a new terminal, log into your VM and find the container ID of your running container with:
-bash-4.2# docker ps -a | grep opencms-stack-cluster | awk '{print $1; exit}'
da501f5b8f83
and commit this container to a new image or overwrite the cloudssky/opencms-stack-cluster image:
-bash-4.2# docker commit <container id from above> cloudssky/opencms-stack-cluster
Now we are ready to run the second cluster node, exposing port 8080 to port 81 on our host:
-bash-4.2# docker run -it -d -P -p 81:8080 cloudssky/opencms-stack-cluster
And see your OpenCms Cluster Docker Containers on your host:
-bash-4.2# docker ps -a
CONTAINER ID IMAGE COMMAND CREATED STATUS PORTS NAMES
d401ffeaec8b cloudssky/opencms-stack-cluster:latest /bin/bash 9 minutes ago Up 9 minutes 0.0.0.0:81->8080/tcp cocky_nobel
da501f5b8f83 cloudssky/opencms-stack-cluster:latest /bin/bash 45 minutes ago Up 45 minutes 0.0.0.0:80->8080/tcp insane_bohr
0bf3ff426357 cloudssky/opencms-stack-mysql:latest /bin/bash About an hour ago Up About an hour 0.0.0.0:3306->3306/tcp insane_t
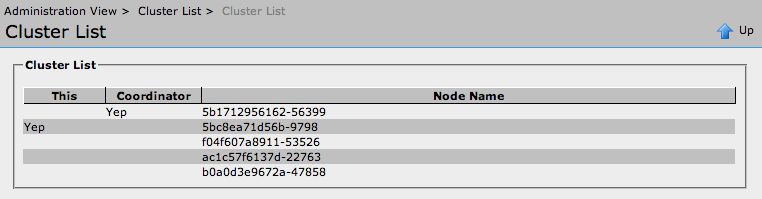
Now the exciting time is coming, log into the OpenCms Workplace and go to the administration view and see your OpenCms Cluster running:
http://10.0.0.16:80/opencms/opencms/system/login/index.html
Username: Admin, Password: admin
Log into the next Workplace at:
http://10.0.0.16:81/opencms/opencms/system/login/index.html
create a new file "hello_occx_world.txt" and switch back to the first workplace and do a reload, you might see the "hello_occx_world.txt" file there, funny? In fact, this is not possible with the standard and even with the closed sourced and obfuscated OpenCms Enterprise Enhancements modules!
Run a fleet of your OpenCms Docker Content Cloud!
If you'd like to run N containers, create a file "run-opencms-cluster" and paste the following lines into it:
#!/bin/bash
for i in "$@"
do
for ((n=0;n<$i;n++))
do
docker run -idt -P cloudssky/opencms-stack-cluster
echo "done, have fun"
done
done
and run N number of containers by sourcing the file "run-opencms-cluster" and list your containers:
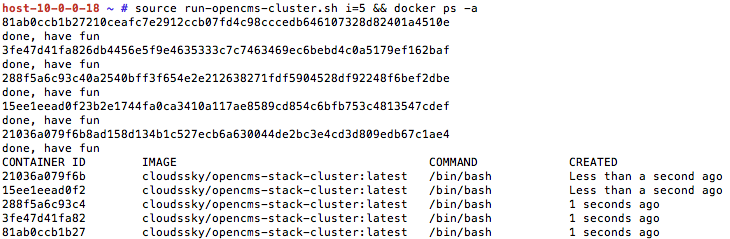
To understand what is happening here, the Infinispan Data Grid Cache Platform distributes and synchronizes all changes between the cluster nodes, if one node fails, the other node becomes the coordinator, we don't have any master / slave design, all nodes are equal.
Beside the multi-workplace support, in the real live, you can place your servers in different regions, near to your users, to avoid high latency and scale your business by adding additional nodes on demand and porvide auto-scaling, which I'm going to show you in the next blog post using Fleet, Kubernetes and HOT Heat templates on OpenStack Icehouse, stay tuned.